My guest today is a blogger who is a very down-to-earth, unassuming person. For those who are unfamiliar with the blogging world, here is a little bit of background. Food blogging is a cut-throat world. People are always trying to find ways and means to increase traffic to the world. Nothing wrong in that. But what this also means is that if you are new to the blogging world, you will see that very few people share with you the tricks of the trade. Then there are those who think they are the best and everyone else is not worth the time of the day! I am blessed to have some good people around me, most notable amongst them being Sonal Gupta from simplyvegetarian777. It was Sonal who introduced me to Radha Natarajan. She blogs from Your Everyday Cook.


I love her recipes! Every recipe in her blog has been made such that it makes cooking easier, simpler and food healthier. It is not often easy to simplify traditional South Indian recipes. But she manages to make even the most complicated authentic recipes simple! Visit her blog Your Everyday Cook, for all the culinary and visual treats!

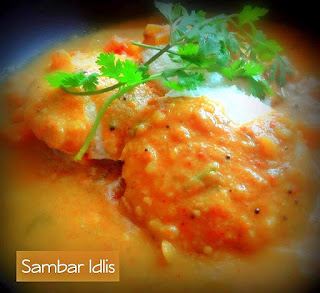
Today she is sharing with a very quick and simple recipe which is geared towards those who are living away from home or are new to the kitchen: Bachelor's Sambar! Sambar is basically a spicy mixed vegetable stew that is served with idlis or rice. Let us now take a look at Radha akka's post.

Bachelor' s sambar recipe is nothing but a quick way of making a delicious sambar without compromising on taste .A time saving one .
Bachelors who are away form home constantly travelling may have very few utensils for preparing dishes or less time to cook , so this style of making a sambar all in one step comes very handy.
I personally dont think it is limited to bachelors alone, even busy moms and housewives can try this.
Most people living in temporary residences will have at least one pressure cooker which doubles up as a cooking utensil too. So the washing chore is reduced greatly, no frying pan required.I find sambar tastier as the dals and vegetables get blended well with spices .This is a great way to make sambar especially in bulk.
Serving size: 2-3
Ingredients:
1 small cup finely chopped onions or small shallots
1 small cup finely chopped tomatoes
1 /4 cup or 1/2 cup cubed yellow pumpkins, carrots, or any vegetables ( drumsticks, capsicums).I used a mix of bell papers and yellow pumpkins.
1/4 cup toor dal ( keep soaked while prepping )
1 tsp asafoetida powder
2-3 tbsp sambar powder
1 tsp kashmiri chili powder for the amazing colour ( recommended)
A pinch of turmeric powder if your sambar powder doesnt have it.
1 tbsp powdered jaggery (optional)
3 tbsp grated fresh coconut or dried. ( optional ) but sambar will taste great with little coconut.
1 tbsp tamrind paste ( or add more tomatoes ) if you dont have tamrind )
salt as required
curry leaves
2-3 tbsp fresh chopped coriander leaves
1/2 tsp mustard seeds
1/4 tsp methi seeds
1-2 red dry chilis
2 tsp oil
Take a pressure pan or pressure cooker.Add oil, heat it, add mustard seeds, let it splutter.
Add the methi seeds and red chilies. add the curry leaves.
Add the chopped onions, or shallots , saute well for few seconds.
Add tomatoes and saute more.Mash lightly.
Add other vegetables, stir well.
Add the fresh grated coconut.
Add 4 cups of water, add sambar powder, turmeric powder, asafoetida powder, salt and tamarind paste.
Add the soaked dal .
Cover and pressure cook for 3-4 whistles.
When cooled, open cooker, lightly mash the dals, but make sure not to mash the vegetables too much.
Add jaggery if you like , garnish with chopped coriander leaves.
For further taste and flavor add 1 tbsp ghee into the hot sambar, stir well, keep covered.
Serve hot with rice or idlis.
Onions can be skipped,however adding them gives a near restaurant like taste.
Add more tomatoes if you do not have tamarind paste or fresh tamarind.
While adding grated fresh coconut is optional ,adding 3-4 tbsp will give a yummy taste to the sambar.
Coconut milk powder ( 2 tbsp ) may also be added instead of grated coconut .
Enjoy!!
I am bringing this delicious and useful dish of Radha akka's to all my friends at Throwback Thursday#37, Fiesta Friday#118 and Saucy Saturdays#43! Angie's Fiesta Friday co-hosts this week are Kaila @ GF Life 24/7 and Laurena @ Life Diet Health
Please do share your thoughts. Your opinion matters!
1 /4 cup or 1/2 cup cubed yellow pumpkins, carrots, or any vegetables ( drumsticks, capsicums).I used a mix of bell papers and yellow pumpkins.
1/4 cup toor dal ( keep soaked while prepping )
1 tsp asafoetida powder
2-3 tbsp sambar powder
1 tsp kashmiri chili powder for the amazing colour ( recommended)
A pinch of turmeric powder if your sambar powder doesnt have it.
1 tbsp powdered jaggery (optional)
3 tbsp grated fresh coconut or dried. ( optional ) but sambar will taste great with little coconut.
1 tbsp tamrind paste ( or add more tomatoes ) if you dont have tamrind )
salt as required
curry leaves
2-3 tbsp fresh chopped coriander leaves
1/2 tsp mustard seeds
1/4 tsp methi seeds
1-2 red dry chilis
2 tsp oil
Method:
Take a pressure pan or pressure cooker.Add oil, heat it, add mustard seeds, let it splutter.
Add the methi seeds and red chilies. add the curry leaves.
Add the chopped onions, or shallots , saute well for few seconds.
Add tomatoes and saute more.Mash lightly.
Add other vegetables, stir well.
Add the fresh grated coconut.
Add 4 cups of water, add sambar powder, turmeric powder, asafoetida powder, salt and tamarind paste.
Add the soaked dal .
Cover and pressure cook for 3-4 whistles.
When cooled, open cooker, lightly mash the dals, but make sure not to mash the vegetables too much.
Add jaggery if you like , garnish with chopped coriander leaves.
For further taste and flavor add 1 tbsp ghee into the hot sambar, stir well, keep covered.
Serve hot with rice or idlis.
Notes:
Use tomato puree if you do not have tomatoes.Onions can be skipped,however adding them gives a near restaurant like taste.
Add more tomatoes if you do not have tamarind paste or fresh tamarind.
While adding grated fresh coconut is optional ,adding 3-4 tbsp will give a yummy taste to the sambar.
Coconut milk powder ( 2 tbsp ) may also be added instead of grated coconut .
Enjoy!!
I am bringing this delicious and useful dish of Radha akka's to all my friends at Throwback Thursday#37, Fiesta Friday#118 and Saucy Saturdays#43! Angie's Fiesta Friday co-hosts this week are Kaila @ GF Life 24/7 and Laurena @ Life Diet Health
Please do share your thoughts. Your opinion matters!